

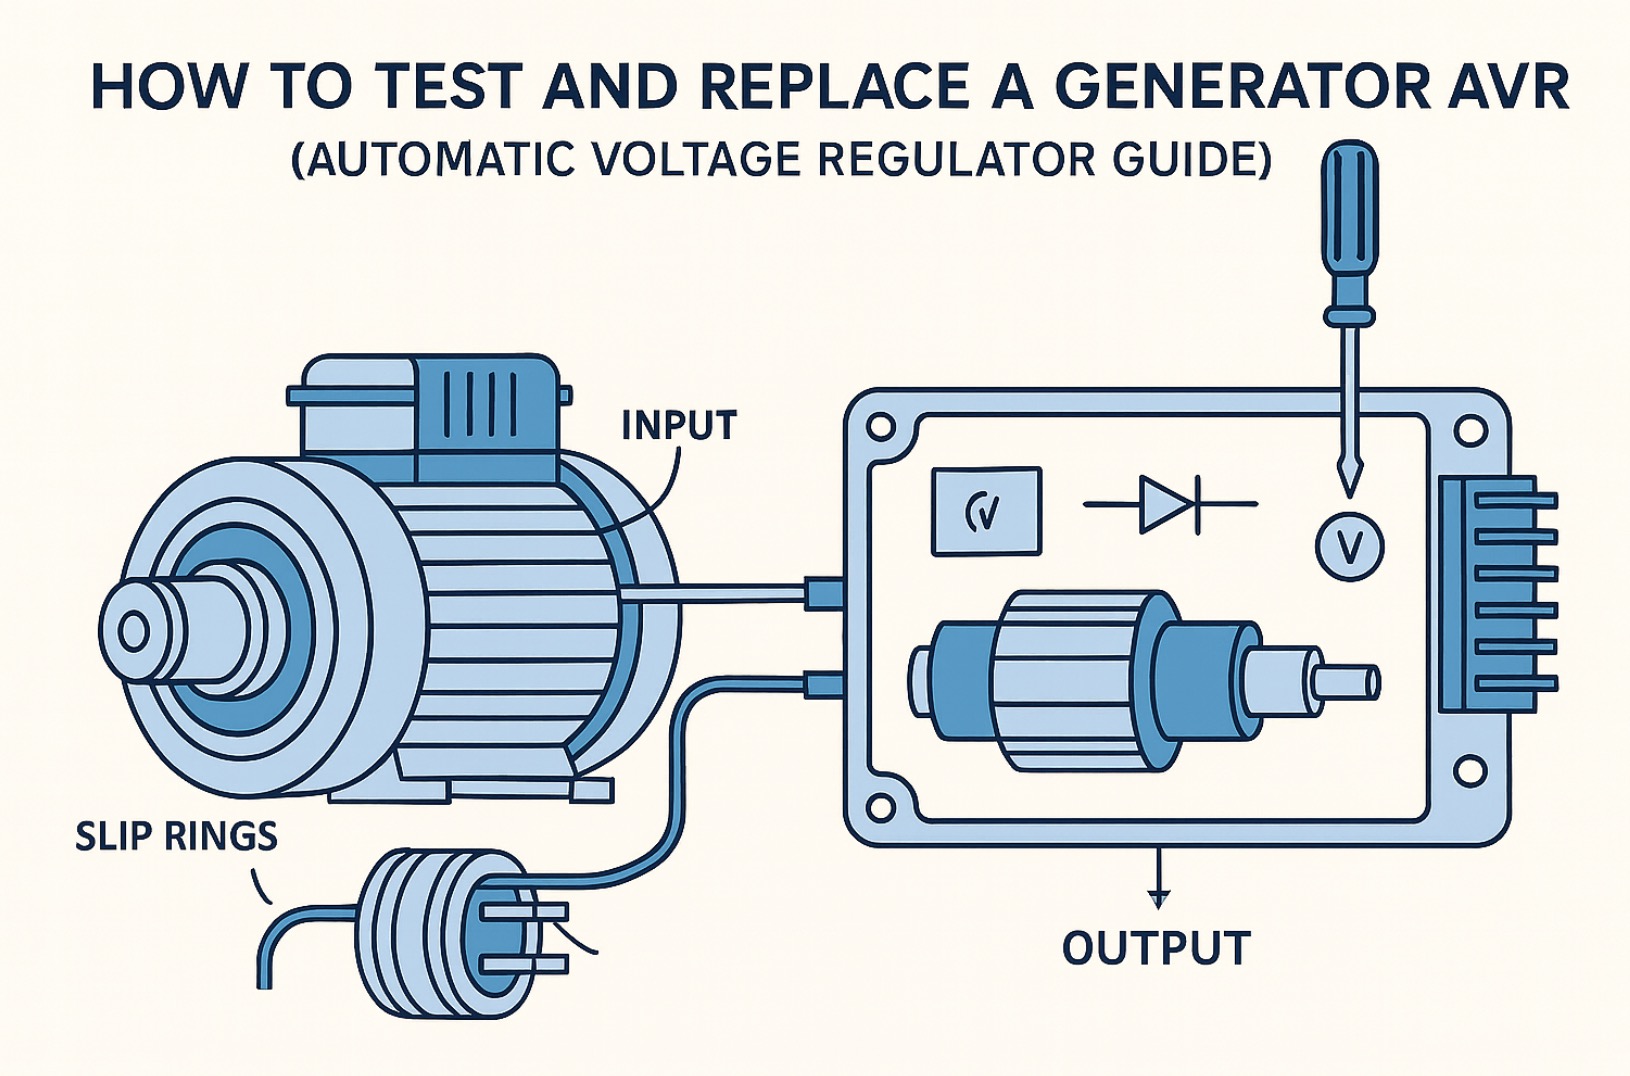
How to Test and Replace a Generator AVR at Home (Automatic Voltage Regulator Guide)
* This site contains affiliate links for which we may be compensated.
* This site contains affiliate links for which we may be compensated.
When a generator engine runs fine but the voltage is low, high, or all over the place, the automatic voltage regulator (AVR) is one of the first suspects. The AVR controls the alternator’s output by regulating the excitation going into the rotor. A failed or weak AVR can leave you with dim lights, fried electronics, or no output at all. This guide walks you through how to safely test and replace a typical portable generator AVR at home.
What Does a Generator AVR Do?
On most modern portable generators, the AVR monitors output voltage and adjusts the rotor’s field current to keep that voltage within a target range (usually around 120/240V). In simple terms, it is the “voltage cruise control” for the alternator.
When the AVR is failing, you might see symptoms like:
- Very low outlet voltage (for example 40–80V instead of ~120V)
- Voltage that surges up and down under steady load
- No AC output at all, even though the engine runs normally
- Lights flickering or tools bogging when other loads switch on
Because other faults (worn brushes, bad rotor/stator windings, loose connections) can produce similar symptoms, it helps to think of the AVR as one piece of the bigger charging and output system. For a wider overview of parts that affect power output, see the breakdown in Generator Parts and Repairs.

5~8KW Generator AVR Automatic Voltage Regulator Rectifier for Honda and Clones Predator Champion Blackmax Generac Powermate Duromax Firman Wen Etq 5000 5500 6500 7000 7500 8000 8500 8750 9000 9500

WOTIAN Generator Avr Automatic Voltage Regulator Compatible with Honda Predator Champion Firman DuroMax Generator Parts 3500 4000 watt 2KW 3KW 3.5KW 4KW 30060-Y025110 Homelite 290440011 4375 4650

FainWan Health Gear Generator Voltage Regulator, Automatic Voltage Regulator Module GAVR-8A Universal AVR Generator 110/220/440 VAC Programmable Input, Hihg acity 8Amp Fuse
Safety First
You will be working close to live 120/240V circuits when testing, so take safety seriously:
- Never touch bare wires or terminals on a running generator.
- Use an insulated digital multimeter rated for mains voltage.
- Wear safety glasses and avoid loose clothing near rotating parts.
- For home standby systems with transfer switches, turn off the main breaker and follow lockout procedures.
- If you are not comfortable testing live voltage, limit yourself to visual inspections and continuity checks with the engine off.
Tools and Parts You May Need
A typical AVR test/replace job is straightforward with a few basic tools:
- Digital multimeter for voltage and continuity checks.
- Insulated screwdrivers and nut drivers to remove covers and panels.
- Replacement generator AVR matched to your model.
- Non-contact voltage tester for basic presence/absence checks.
- Zip ties and electrical tape for securing wiring after the repair.
If you are trying to identify the correct AVR or rotor/brush configuration for a specific brand and model, it can be useful to look at how OEM parts are organized in model-focused pages such as Generator Parts and Repairs or other brand-specific parts breakdowns.
Step 1: Confirm You Really Have an Output Problem
Before diving into the AVR, confirm that the generator is not simply being limited by a tripped breaker or bad cord:
- Start the generator, let it warm up, and plug in a simple test load (work light or fan) directly to a 120V outlet.
- If the load does not run, use a meter to measure voltage at that outlet.
- Check and reset all breakers and GFCI outlets on the generator panel.
- If you only see very low voltage, or if voltage is unstable under a light load, the problem is likely in the AVR/alternator area.
If your generator is connected to a house via transfer switch and the engine runs but the house stays dark, walk through the type of checks described in articles like “Generator Runs but No Power to the House?” style guides before blaming the AVR—cables, inlets, and breakers can also be at fault.
Step 2: Locate the AVR on Your Generator
On most portable generators the AVR is mounted in or behind the alternator end cover:
- Shut the generator off, let it cool, and disconnect the spark plug boot.
- Remove the rear alternator cover (opposite the engine) using a screwdriver or socket.
- Look for a small rectangular module, usually with two or more wires going to the stator windings and a plug going to the control panel.
- Some AVRs are held in by two screws and plug-in connectors; others are partially potted and hard-wired.
Take clear photos of the AVR connections and wiring colors before unplugging anything. Those reference images are invaluable when you install the new unit.
Step 3: Basic AVR Output and Stator Checks
With the AVR located, you can perform some basic checks to narrow down whether it or the stator/rotor is to blame:
- Inspect for obvious damage: burned spots, melted resin, cracked epoxy, or loose/broken wires on the AVR.
- With the engine off and AVR unplugged, use your meter to measure resistance of the stator excitation winding terminals (often labeled as wires going to the AVR). Typical values are in the low-ohm range; an open circuit or direct short suggests a stator problem.
- Check rotor brushes and slip rings (on brushed units). Severely worn brushes or very dirty slip rings can mimic AVR failure.
On some generators, especially inverter types, the AVR function is built into a combined control module. In that case, rely heavily on your model’s service documentation and wiring diagrams rather than guessing. The troubleshooting style shown in brand-focused repair content such as the troubleshooting flow used in Generator Parts and Repairs can give you a sense of how to proceed step-by-step.
Step 4: Live Voltage Checks (If You’re Comfortable)
If you are confident working around live circuits, you can perform simple tests with the AVR connected:
- Reconnect the spark plug and start the generator with all loads disconnected.
- Measure AC voltage at the main outlet; note if it is very low, very high, or unstable.
- Measure the AC voltage coming from the stator to the AVR (follow your wiring diagram). Low or zero voltage there could mean a stator issue.
- Some AVRs provide a DC output to the rotor field. Measuring that DC voltage (if accessible and documented in your manual) can help confirm whether the AVR is driving the field properly.
If you see normal stator voltages feeding the AVR but the output to the rotor field is missing or wild, the AVR is a strong suspect. If both stator and AVR-side voltages are low or absent, suspect windings or wiring instead.
Step 5: Removing the Old AVR
Once you are reasonably confident the AVR is faulty:
- Shut the generator off, turn the fuel valve off, and disconnect the spark plug boot again.
- Remove the alternator end cover if you have not already.
- Unplug the AVR connectors carefully; avoid pulling on the wires themselves.
- Note or label each connector and wire if there is any chance of confusion.
- Remove the mounting screws or bolts holding the AVR in place.
Keep the old AVR handy for comparison when you receive or select the replacement.
Step 6: Choosing and Installing a Replacement AVR
You have two main options: an OEM part or a compatible replacement.
- Search by generator brand/model or alternator ID for the exact part number, and look up a matching AVR replacement that matches your connector style and voltage rating.
- If you select a “universal” universal generator AVR, double-check wiring diagrams and adjustability (voltage and frequency) before installing.
- Match wire colors and connector positions exactly to your photos and manual.
- Mount the new AVR securely in the same location, ensuring it has proper airflow and is not rubbing against sharp edges.
When in doubt, defer to your generator brand’s official documentation. Manufacturers like Generac, Honda, Yamaha, and others provide wiring diagrams and parts info in their support portals—for example, Generac’s resource page at Generac Product Support Lookup.
5~8KW Generator AVR Automatic Voltage Regulator Rectifier for Honda and Clones Predator Champion Blackmax Generac Powermate Duromax Firman Wen Etq 5000 5500 6500 7000 7500 8000 8500 8750 9000 9500
WOTIAN Generator Avr Automatic Voltage Regulator Compatible with Honda Predator Champion Firman DuroMax Generator Parts 3500 4000 watt 2KW 3KW 3.5KW 4KW 30060-Y025110 Homelite 290440011 4375 4650
FainWan Health Gear Generator Voltage Regulator, Automatic Voltage Regulator Module GAVR-8A Universal AVR Generator 110/220/440 VAC Programmable Input, Hihg acity 8Amp Fuse
Step 7: Test the Generator with the New AVR
After installation, it is time to verify that the AVR fix worked:
- Double-check all connections, plug the alternator cover harnesses back in, and reinstall the end cover if required for safe operation.
- Start the generator with no loads connected and let it warm up.
- Measure outlet voltage with your digital multimeter; you should see stable voltage near the rated 120/240V.
- Gradually add loads (lights, tools, appliances) and confirm that voltage remains within a reasonable window under load.
- Watch and listen for any unusual flickering or surging as loads switch on and off.
If the new AVR does not change the symptoms at all, revisit your stator, rotor, brushes (if equipped), and wiring connections. The AVR can only regulate what the alternator gives it.
Common Mistakes When Replacing an AVR
Avoid these pitfalls to make your repair stick the first time:
- Installing an AVR with the wrong voltage or frequency rating for your generator.
- Mis-wiring the AVR leads (swapping stator and field connections).
- Ignoring underlying problems such as shorted windings or damaged brushes.
- Running the generator over its rated load, which can cause repeat AVR failures.
If you are comparing features, support, and repair-friendliness across brands for a future purchase, detailed guides like 5W20 vs 5W30 vs 10W30 Oil – Which One to Use for Generators? can also give you a feel for how specs and maintenance choices affect long-term reliability.
Preventive Tips to Extend AVR and Alternator Life
Good habits can significantly reduce stress on your AVR and alternator:
- Avoid frequent overloads; size your generator so typical loads stay below 75–80% of rated output.
- Keep electrical connections clean and tight to prevent hot spots and voltage spikes.
- Run the generator monthly under load so the AVR, windings, and contacts stay healthy.
- Protect the generator from moisture and corrosive environments as much as possible.
- Pair AVR work with basic maintenance (oil, filters, fuel system) like that described in broader repair and parts content such as Generator Parts and Repairs.
Summary
Testing and replacing a generator AVR at home is very doable if you are comfortable with basic electrical checks. Start by confirming an actual output problem, locate the AVR, perform simple resistance and live-voltage tests, and then swap in a correctly matched replacement. Combined with good wiring practices and sensible loading, a healthy AVR will keep your generator’s voltage stable and your tools and appliances much happier in the long run.

Savior Generator Petcock Fuel Gas Tank Switch Shut Off Valve for Predator Champion Generac Etq Homelite Husky Powermax Replace 0j0974 (16mm x 1.5mm)
(as of April 12, 2026 14:38 GMT +00:00 - More infoProduct prices and availability are accurate as of the date/time indicated and are subject to change. Any price and availability information displayed on [relevant Amazon Site(s), as applicable] at the time of purchase will apply to the purchase of this product.)
YAMAKATO Predator 9000 8750 6500 4000 4375 Generator Fuel Tank Shut Off Valve Fuel Petcock for Centurion Honda Westinghouse Duromax Durostar Powermate Powerhorse ETQ M16X1.5mm
(as of April 12, 2026 12:51 GMT +00:00 - More infoProduct prices and availability are accurate as of the date/time indicated and are subject to change. Any price and availability information displayed on [relevant Amazon Site(s), as applicable] at the time of purchase will apply to the purchase of this product.)
WEN GNA410 Generator Wheel and Handle Kit for WEN 4500 and 4750-Watt Generators (Black)
(as of April 12, 2026 12:53 GMT +00:00 - More infoProduct prices and availability are accurate as of the date/time indicated and are subject to change. Any price and availability information displayed on [relevant Amazon Site(s), as applicable] at the time of purchase will apply to the purchase of this product.)
WEN 55201 Magnetic Oil Dipstick for Inverter Generators (compatible with WEN, Yamaha, Predator)
(as of April 12, 2026 12:52 GMT +00:00 - More infoProduct prices and availability are accurate as of the date/time indicated and are subject to change. Any price and availability information displayed on [relevant Amazon Site(s), as applicable] at the time of purchase will apply to the purchase of this product.)About GeneratorStop.com
We are your #1 power generator guide and resource online. We are dedicated on providing you the best and most useful generator related articles, reviews and tools. learn more...