


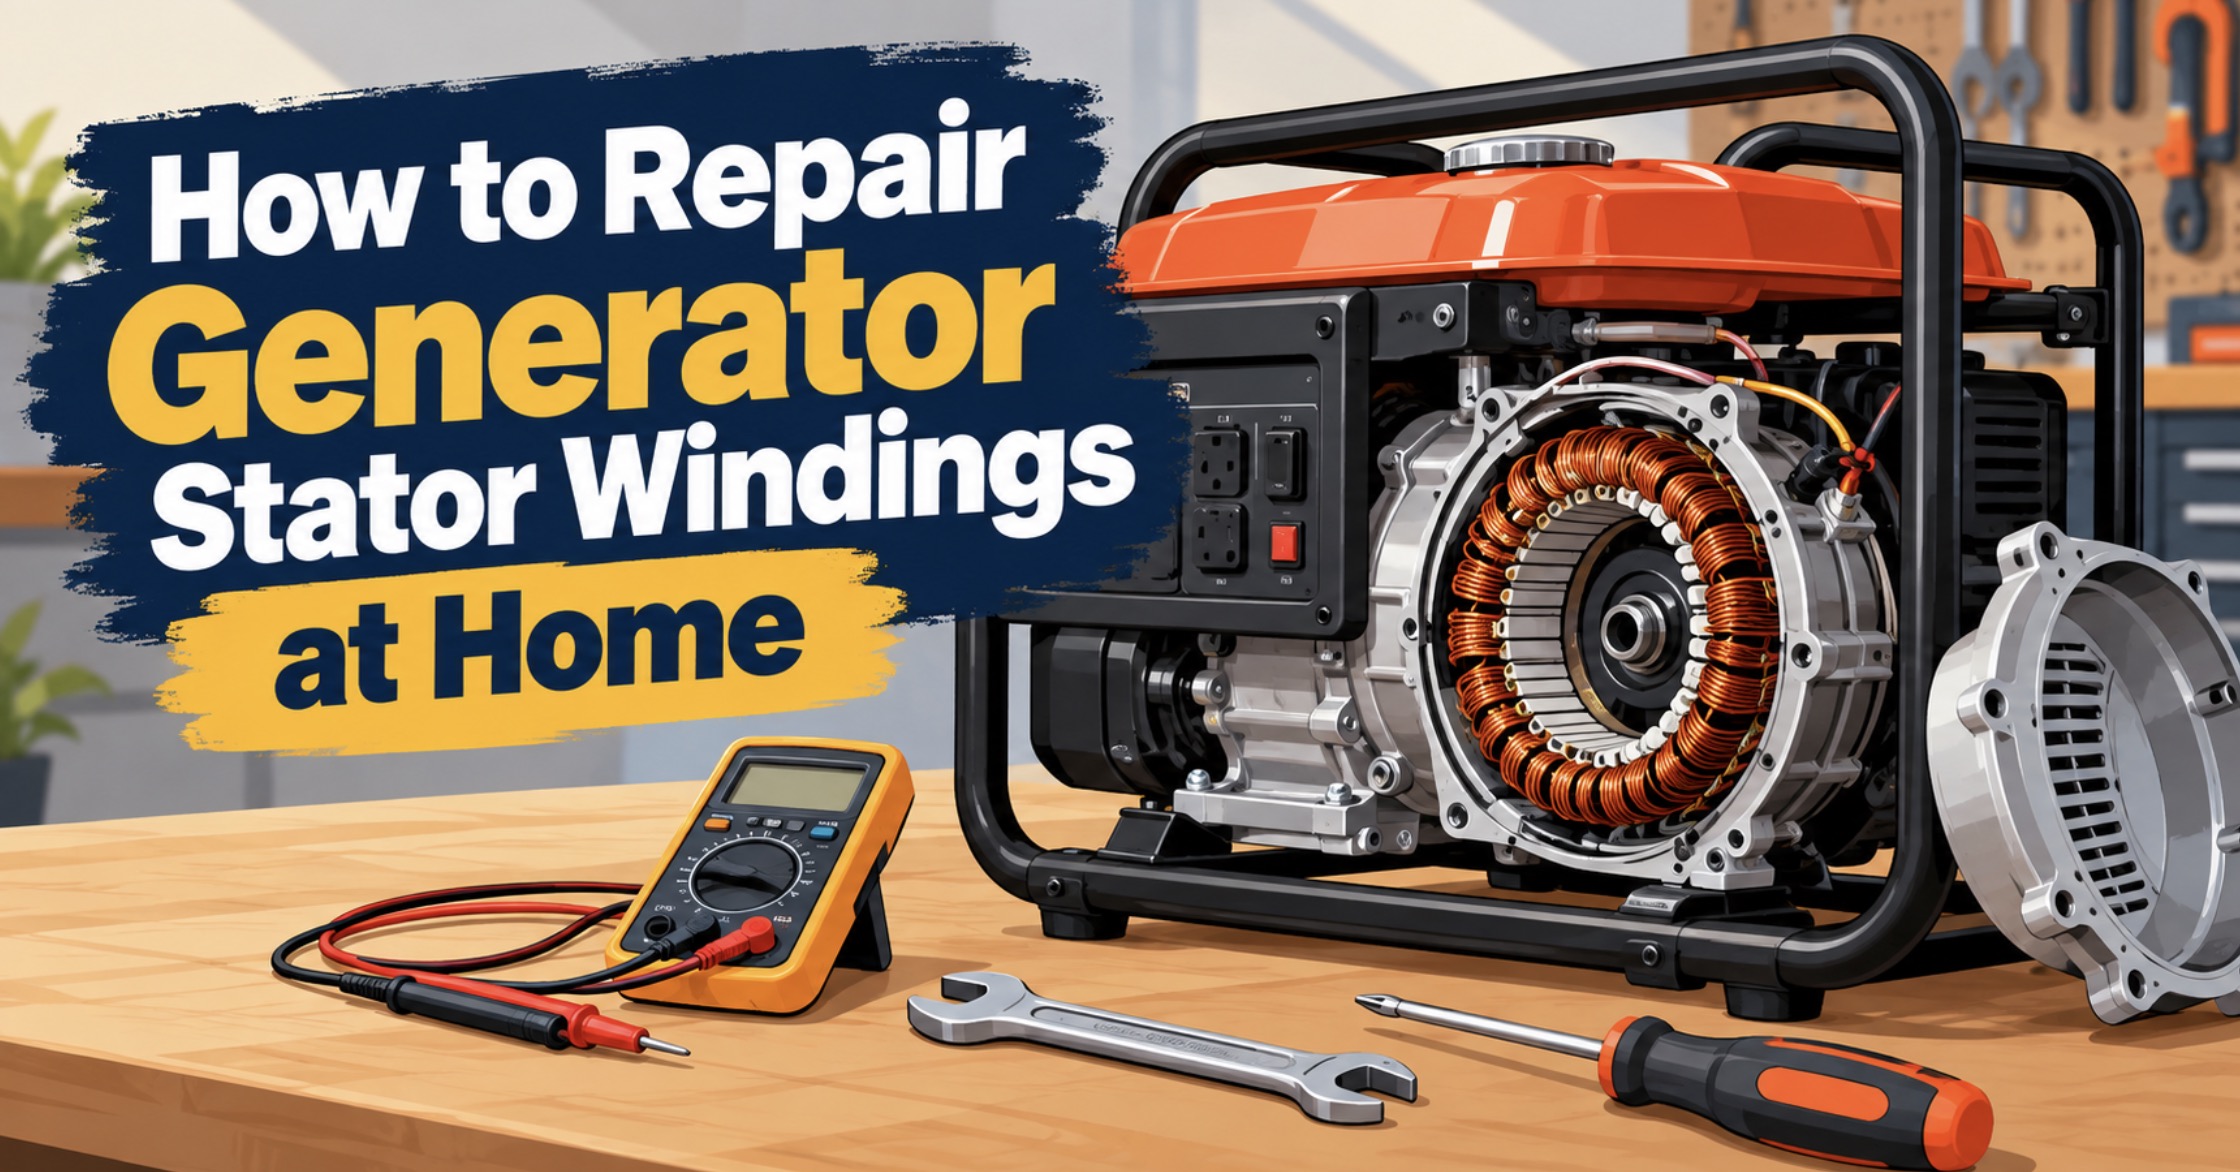
How to Repair Generator Stator Windings at Home
* This site contains affiliate links for which we may be compensated.
A generator that starts and runs normally but produces little or no electricity may have a problem with its stator windings. The stator is one of the most important components inside the generator’s alternator. It contains copper windings that help produce electrical power when the engine turns the rotor. If those windings become burned, shorted, corroded, or disconnected, the generator may stop supplying electricity even though the engine itself continues running.
The good news is that not every suspected stator failure requires replacing the entire generator. Some problems come from loose wires, damaged terminals, corroded connections, or broken leads that can be repaired at home. However, severely burned windings, shorted coils, and damaged insulation often require professional rewinding or complete stator replacement.
Before spending money on a replacement stator, it is important to confirm that the stator is actually defective. Many electrical output problems are caused by a faulty automatic voltage regulator (AVR), worn carbon brushes, damaged rotor windings, tripped breakers, or disconnected wires rather than the stator itself.
For a broader explanation of generator electrical components, see Generator Parts and Repairs.
What Is a Generator Stator and How Does It Work?
The stator is the stationary part of a generator’s alternator. It usually consists of a laminated iron core wrapped with insulated copper wire. As the rotor turns inside the stator, its changing magnetic field induces electrical voltage in the stator windings.
In conventional portable generators, the stator commonly contains the main output windings responsible for supplying electricity to the outlets. Depending on the generator design, it may also include auxiliary windings for excitation or other electrical functions.
The major components involved in electricity generation include:
- Stator: The stationary windings that produce electrical output.
- Rotor: The rotating component that produces the changing magnetic field.
- AVR: The automatic voltage regulator that helps control output voltage on compatible generators.
- Carbon brushes: Components that transfer electrical current to the rotor on certain generator designs.
- Slip rings: Conductive rings used with brushes on some alternators.
- Output wiring: Connections carrying electricity from the windings to the control panel and outlets.
- Circuit breakers: Protective devices that interrupt excessive current.
If the stator windings fail, the generator may produce no voltage, reduced voltage, unstable voltage, or uneven output between different circuits.

Generator Stator for Polaris Big Boss Trail Boss Xplorer 250 1989-2006

Tapa Stator Rotor Assembly for Harbor Freight Predator 9500 Invertor Generator

29987-06 Generator Stator Coil Compatible with 2006-2013 Harley Davidson Electra Glide Road King Road Glide Stator Coil Replaces 2998706 29987-06A 29987-06B 29987-06D
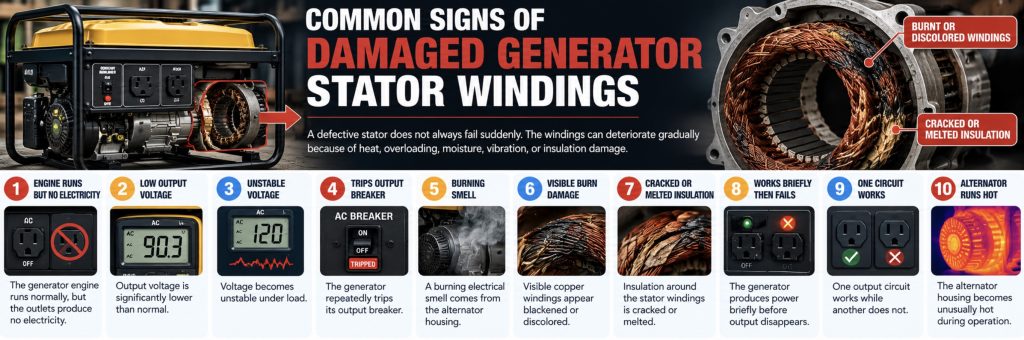
Common Signs of Damaged Generator Stator Windings
A defective stator does not always fail suddenly. Sometimes the windings deteriorate gradually because of heat, overloading, moisture, vibration, or insulation damage.
Common symptoms include:
- The generator engine runs normally, but the outlets produce no electricity.
- Output voltage is significantly lower than normal.
- Voltage becomes unstable under load.
- The generator repeatedly trips its output breaker.
- A burning electrical smell comes from the alternator housing.
- Visible copper windings appear blackened or discolored.
- Insulation around the stator windings is cracked or melted.
- The generator produces power briefly before output disappears.
- One output circuit works while another does not.
- The alternator housing becomes unusually hot during operation.
These symptoms can also occur when other electrical parts fail. That is why diagnosis should come before replacement.
If you want help distinguishing stator problems from rotor problems, see How to Tell If Your Generator Stator or Rotor Is Bad (No Special Tools Needed).
What Causes Generator Stator Windings to Fail?
Stator windings are designed to operate for many years, but several conditions can cause premature damage.
1. Generator Overloading
Running more electrical equipment than the generator is rated to handle increases current through the windings. Excessive current creates heat, and repeated overheating can damage the insulation surrounding the copper wires.
2. Poor Cooling and Ventilation
Blocked alternator vents, accumulated dirt, or damaged cooling components can prevent heat from escaping. Higher operating temperatures accelerate winding insulation deterioration.
3. Moisture and Corrosion
Generators stored in damp sheds, humid garages, or exposed outdoor locations may develop moisture inside the alternator housing. Moisture can reduce insulation resistance and promote corrosion around terminals and winding connections.
4. Short Circuits
A damaged appliance, faulty extension cord, or internal wiring fault may cause a short circuit. If protective devices fail to interrupt the fault quickly, excessive current can damage the stator.
5. Vibration Damage
Generators vibrate during operation. Over time, loose mounting hardware or unsupported wiring may allow winding leads to rub against metal surfaces or break near terminals.
6. Aging Insulation
Heat, vibration, contamination, and normal aging gradually weaken winding insulation. Once insulation breaks down, neighboring turns or windings may short together.
7. Incorrect Electrical Connections
Improper modifications, incorrect wiring, or unsuitable connected equipment can create electrical conditions beyond the alternator’s design limits.
Safety Precautions Before Repairing a Generator Stator
Stator repair involves electrical components that can produce dangerous voltage. Some generator designs also contain capacitors that can retain electrical energy after shutdown.
Before inspecting the alternator:
- Turn the generator off completely.
- Disconnect every appliance and extension cord.
- Allow the engine and alternator housing to cool.
- Disconnect the spark plug boot on portable gasoline generators to prevent accidental starting.
- Disconnect the battery according to the manufacturer’s instructions if the generator uses electric start.
- Disconnect the generator from any transfer switch or building electrical system using the appropriate isolation procedure.
- Check for stored electrical energy and follow the manufacturer’s capacitor discharge procedures.
- Wear eye protection and insulated protective equipment appropriate to the work.
- Use the correct service manual and wiring diagram.
Important: Never perform resistance, continuity, or insulation measurements on energized generator windings. Confirm that the relevant circuits are de-energized and isolated before testing.
Do not operate the generator with the alternator cover removed or reach into the rotor area while the engine is running. Live electrical components and rotating machinery can cause serious injury.
Tools and Supplies You May Need
Basic stator diagnosis does not necessarily require expensive equipment. Many initial inspections can be performed with a few common tools.
Useful supplies include:
- Digital multimeter with resistance and continuity functions
- Screwdrivers and socket set
- Electrical contact cleaner approved for the relevant materials
- Soft cleaning brush
- Flashlight
- Replacement connectors and terminals
- Heat-resistant electrical insulation materials of the correct rating
- Generator service manual and wiring diagram
- Camera or phone for documenting connections
- Insulation resistance tester for qualified users performing manufacturer-approved testing
A basic digital multimeter is useful for checking winding resistance and continuity. A set of electrical terminal connectors may also help when repairing damaged external connections.
For more advanced diagnosis, a properly rated insulation resistance tester can help evaluate insulation condition, although using one incorrectly can damage sensitive generator electronics.

Fluke 1535 Insulation Tester, Insulation Tester, for Frontline Industrial and Electrical Insulation Testing, Test Voltages from 250 V to 2500 V and Resistance Measurements up to 500 GΩ

Klein Tools ET600 Megohmmeter Insulation Tester Multimeter | 4000 Ohms Resistance, 125V/250V/500V/1000V, Auto-Ranging TRMS Multimeter

Fluke 1503 Insulation Resistance Tester | Digital
Step 1: Rule Out Simple Electrical Problems First
Before removing the stator, confirm that the problem is not caused by an external electrical issue.
Check the following:
- Make sure the generator’s main circuit breaker is switched on.
- Reset any tripped outlet breakers.
- Check GFCI outlets and reset them if necessary.
- Inspect extension cords for damage.
- Confirm that the connected appliance works on another suitable power source.
- Check whether all generator outlets are affected.
- Inspect the 120V/240V selector switch if the generator has one.
If the engine runs normally but there is no output, begin with these checks before opening the alternator housing.
A failed breaker, damaged outlet, or loose connection can create symptoms that resemble a burned stator.
Step 2: Check the AVR Before Blaming the Stator
The automatic voltage regulator controls excitation on many conventional portable generators. If the AVR fails, the alternator may produce little or no voltage even when the stator windings are still healthy.
Possible AVR failure symptoms include:
- Very low output voltage
- Unstable voltage
- No output despite normal engine operation
- Voltage that rises or falls unpredictably
AVR problems are especially worth investigating when the stator windings look clean, connections are intact, and no obvious insulation damage is visible.
For a dedicated troubleshooting procedure, see How to Test and Replace a Generator AVR at Home (Automatic Voltage Regulator Guide).
An AVR is generally easier to replace than a complete stator. However, the replacement must match the generator’s electrical specifications and wiring arrangement.
Step 3: Remove the Alternator Cover for Inspection
If external checks do not reveal the problem, inspect the stator and its accessible connections.
The alternator is normally located opposite the engine’s recoil starter on many open-frame portable generators.
General inspection steps:
- Shut down and isolate the generator completely.
- Remove the alternator end cover according to the service manual.
- Take photographs before disconnecting any wires.
- Identify the stator terminals, output wires, and AVR connections.
- Inspect the visible windings and wiring for damage.
- Check for moisture, corrosion, loose connectors, or burned insulation.
Some alternators require additional disassembly to access the complete stator. Do not force covers, pull on winding leads, or separate the rotor and stator without the correct procedure.
Step 4: Inspect the Stator Windings for Physical Damage
A visual inspection can reveal obvious failures before electrical testing begins.
Look for:
- Blackened copper windings
- Burned varnish
- Cracked or brittle insulation
- Melted insulating sleeves
- Broken winding leads
- Loose terminal connections
- Rust or corrosion on the laminated core
- Oil contamination
- Signs of water entering the alternator
A healthy stator usually has windings with consistent insulation color and no obvious charring or melted areas.
However, appearance alone is not enough to confirm that a stator is healthy. A winding can have an internal short even when the outer insulation looks normal.
Likewise, darkened insulation does not automatically mean the stator must be replaced. Some winding coatings naturally darken over time.
Step 5: Test Stator Winding Resistance With a Multimeter
Resistance testing can help identify open windings, broken connections, or significant differences between comparable winding sections.
Before measuring anything, use the generator’s wiring diagram to identify the appropriate winding terminals.
General procedure:
- Make sure the generator is completely shut down and electrically isolated.
- Disconnect the winding leads from connected electronics as directed by the service manual.
- Set the digital multimeter to the appropriate low-resistance range.
- Account for test lead resistance if the meter supports relative or zero compensation.
- Measure resistance across the specified winding terminals.
- Record each reading.
- Compare the readings with the manufacturer’s specifications.
What the readings may indicate:
- Infinite or open-circuit resistance: May indicate a broken winding or disconnected conductor.
- Resistance outside specification: May indicate damage or an incorrect measurement point.
- Significant differences between identical winding sections: May suggest an electrical problem.
- Very low resistance: May be normal for certain generator windings and does not automatically indicate a short circuit.
Many stator windings have extremely low resistance. An ordinary multimeter may not be accurate enough to identify shorted turns.
For that reason, a resistance test is useful for finding obvious faults but cannot reliably prove that the stator is completely healthy.
Step 6: Check for Winding Shorts to Ground
The stator winding insulation prevents unwanted electrical contact between the copper conductors and the metal alternator frame.
If that insulation breaks down, current may leak into the metal core or housing.
An initial continuity check may help identify a severe ground fault:
- Confirm that all relevant circuits are de-energized.
- Isolate the winding from connected electronic components according to the manual.
- Identify the winding terminals and frame reference points.
- Perform the manufacturer-approved continuity check.
- Record any unexpected electrical connection to the stator frame.
An unexpected low-resistance connection between an isolated winding and the stator core may indicate insulation damage.
However, some generator designs intentionally connect certain electrical points to ground or neutral. Always consult the wiring diagram before interpreting the result.
A standard multimeter cannot detect every insulation defect.
Step 7: Understand Insulation Resistance Testing
Professional technicians often use an insulation resistance tester, commonly called a megohmmeter, to evaluate stator insulation.
Unlike a standard multimeter, this device applies a controlled DC test voltage to measure insulation resistance.
It can help identify:
- Moisture contamination
- Insulation deterioration
- Ground leakage paths
- Damage caused by overheating
- Electrical insulation problems not visible externally
Important: Insulation resistance testing should only be performed using the test voltage and procedure specified by the manufacturer. Sensitive AVRs, inverter boards, rectifiers, surge protection components, and other electronic devices may be damaged if they are not properly isolated.
The windings must also be discharged according to the testing procedure after applying test voltage.
If you do not have the correct service instructions or experience, have a generator technician perform this test.
Step 8: Repair Loose or Broken External Stator Connections
Not every stator electrical problem requires rewinding. Some of the most practical DIY repairs involve accessible external connections.
Common repairable problems include:
- Loose terminal screws
- Disconnected output wires
- Corroded spade connectors
- Broken external leads near terminal blocks
- Damaged wiring connectors
- Loose connections between the stator and AVR
For example, if a stator winding is healthy but the output lead has become disconnected from its terminal, restoring the correct connection may return the generator to normal operation.
Use the manufacturer’s specified connectors, wire ratings, insulation materials, and fastening methods.
Do not substitute ordinary household wire or low-temperature connectors for heat-rated alternator components.
If a conductor is broken where it emerges directly from the winding bundle, the repair becomes more complicated and should be evaluated by a qualified technician.
Step 9: Clean Corrosion and Dirt From the Stator Assembly
Dirt, moisture, and corrosion can contribute to electrical problems, particularly in generators that have been stored for months or used outdoors.
Cleaning can sometimes restore connections that are affected by surface contamination.
Basic cleaning precautions:
- Make sure the generator is fully isolated and cool.
- Use a soft brush to remove loose dust.
- Clean accessible metal terminal contacts with an appropriate electrical contact cleaner.
- Remove loose debris without scraping winding insulation.
- Inspect the assembly for signs of moisture.
- Allow cleaned components to dry completely before reassembly.
Avoid household degreasers, excessive water, harsh solvents, and high-pressure cleaning.
Do not scrape or sand the insulated copper windings. Damaging the enamel can create new short circuits.
Step 10: Can You Repair Burned Stator Windings at Home?
This depends on the extent and location of the damage.
Some stator problems are practical DIY repairs. Others require specialized equipment and professional motor-rewinding knowledge.
Repairs that may be suitable for experienced DIY owners:
- Replacing damaged terminal connectors
- Cleaning corrosion from accessible electrical connections
- Repairing approved external wiring connections
- Replacing an entire stator assembly
- Correcting loose connections between the alternator and control panel
Repairs that generally require professional service:
- Replacing burned winding sections
- Rewinding copper coils
- Repairing insulation breakdown deep inside the stator slots
- Restoring shorted turns
- Rebuilding damaged end windings
- Applying and curing industrial winding insulation systems
If the stator has blackened copper, melted winding insulation, or multiple shorted coils, replacing the complete stator is often the more practical home repair.
What Is Involved in Rewinding a Generator Stator?
Professional stator rewinding is a specialized process. It involves more than wrapping new copper wire around the iron core.
A proper rewind must preserve the alternator’s original electrical design.
The technician must account for:
- Wire gauge and conductor type
- Number of turns per coil
- Winding pitch
- Coil grouping
- Electrical phase arrangement
- Insulation temperature rating
- Slot liners and insulating separators
- Coil connections
- Winding polarity
- Varnish impregnation and curing
- Final electrical testing
Incorrect winding specifications can produce the wrong voltage, excessive heat, poor frequency-related performance, or electrical shorts.
A professional rewind typically involves documenting the original winding arrangement, removing damaged conductors, preparing the core, installing correctly specified replacement coils, insulating and securing the windings, applying an appropriate insulation treatment, and performing electrical tests.
This is not a repair that should be attempted by guessing the number of turns or using ordinary electrical wire.
Step 11: Replacing the Complete Generator Stator
If the stator has extensive winding damage, replacing the complete assembly may be easier than repairing individual coils.
Replacement stators are available for some Honda, Champion, Generac, Westinghouse, Predator, Briggs & Stratton, and other generator models.
Before buying a replacement:
- Find the generator model number.
- Record the engine and alternator identification numbers.
- Confirm the stator part number.
- Check the generator’s rated voltage and frequency.
- Confirm the winding and connector arrangement.
- Verify physical mounting compatibility.
- Check whether additional gaskets, bearings, or hardware are required.
A replacement portable generator stator assembly may be available, but matching by appearance alone is not reliable.
The mechanical procedure varies significantly between generator designs. Some require separating the alternator housing from the engine, supporting the rotor correctly, and using special pullers or alignment procedures.
A replacement stator should be installed using the official service instructions for that alternator. Incorrect removal or reassembly can damage bearings, the rotor, engine shaft, or new windings.

POWER PRODUCTS Stator Rotor/Motor Assembly-Compatible Replacement for Predator Inverter Generators 3500-Watt Surge / 3000-Watt Running (SKU# 71358, 59137)

JJing Stator Rotor Assembly Compatible with Harbor Freight Predator 3500 Watt Inverter Generator

Charge Coil Alternator Stator Replacement for DuroMax XP35HPE Generator Stator Assembly Engine Charging Coil Generator Parts
Step 12: Inspect the Rotor and Carbon Brushes
Before reinstalling the alternator cover, inspect the rotor and brush assembly if your generator design uses them.
A stator can test normally while the generator still has no electrical output because the rotor is not receiving the excitation current it needs.
Check for:
- Worn carbon brushes
- Broken brush springs
- Damaged slip rings
- Loose brush wiring
- Burned rotor connections
- Visible rotor winding damage
Brush replacement can sometimes solve electrical output problems without replacing the stator.
If you are sourcing parts, search for generator carbon brush replacements that match your generator’s model.
Step 13: Reassemble the Generator and Check Connections
Once inspection or repair is complete, carefully reassemble the alternator.
Before restoring operation:
- Confirm all wiring connections match the original diagram.
- Make sure no wires are pinched by covers or mounting hardware.
- Check that terminals are tight to specification.
- Confirm the AVR and brush connections are correct.
- Make sure all protective covers are installed.
- Check that cooling vents are clear.
- Verify that all tools and loose parts have been removed.
If the stator or rotor was removed, the mechanical installation must also be verified according to the service manual before the generator is started.
Step 14: Test the Generator After Repairs
After a repair, the generator should be checked before connecting expensive electronics or household appliances.
With the generator fully reassembled, a qualified person can perform manufacturer-approved output tests.
A typical verification process includes:
- Starting the generator with no appliances connected.
- Checking for unusual noise or vibration.
- Confirming the generator’s output voltage is within specification.
- Checking frequency where applicable.
- Testing a suitable small load.
- Increasing load gradually within the generator’s rated capacity.
- Monitoring for overheating, unstable output, unusual smells, or breaker trips.
Do not attempt to measure live electrical connections inside an open alternator housing unless you are qualified to perform that work.
If the generator produces abnormal voltage, smells burned, or trips protection after the repair, shut it down and investigate before continuing.
Stator Repair vs Replacement: Which Is Better?
The best choice depends on the damage, generator size, parts availability, and labor cost.
Repairing external connections makes sense when:
- The winding itself is still electrically sound.
- Damage is limited to accessible terminals or connections.
- The required repair materials are available.
- Insulation and mechanical integrity can be restored properly.
Professional rewinding may make sense when:
- The generator is expensive or commercial-grade.
- A new stator is unavailable.
- The stator core remains in good condition.
- A motor-rewinding shop can reproduce the original winding specifications.
Complete stator replacement may make sense when:
- The winding insulation is extensively damaged.
- Replacement assemblies are reasonably priced.
- The generator is a common portable model.
- Repair labor would exceed the cost of replacement.
For small consumer generators, professional rewinding can sometimes cost more than a replacement alternator or a new generator.
How Much Does Generator Stator Repair Cost?
Repair costs vary significantly based on generator size, location, parts availability, and the type of damage.
Common expenses include:
- Multimeter or diagnostic equipment
- Replacement wiring connectors
- Electrical contact cleaner
- Replacement brushes
- AVR replacement if needed
- Replacement stator assembly
- Professional diagnostic labor
- Specialized rewinding labor
A loose connector may cost very little to repair. A complete stator replacement can be substantially more expensive, especially on high-output units.
Always obtain the correct part number and compare the repair estimate with the value of the generator before ordering major components.
Why Generator Stator Repairs Sometimes Fail Again
A replacement or repaired stator can fail again if the original cause of damage remains unresolved.
For example, replacing burned windings without correcting an overload or cooling problem may result in another failure.
Common reasons for repeat failures include:
- Continued generator overloading
- Blocked cooling airflow
- Incorrect winding repair materials
- Moisture remaining inside the alternator
- Loose electrical connections
- Faulty voltage regulation
- Damaged output wiring
- Incorrect replacement components
Before returning the generator to regular service, identify why the original stator failed.
How to Prevent Generator Stator Winding Damage
Good maintenance and operating habits can significantly reduce the risk of stator failure.
1. Avoid Overloading
Keep connected appliances within the generator’s rated running wattage. Account for startup surge from refrigerators, pumps, compressors, and air conditioners.
2. Keep Cooling Vents Clear
Remove dirt, grass, dust, and debris from alternator cooling openings.
3. Store the Generator in a Dry Location
Protect the generator from prolonged humidity, rain, and condensation during storage.
4. Inspect Wiring Periodically
Check for loose terminals, damaged cords, melted outlets, and other electrical problems during routine maintenance.
5. Avoid Repeated Breaker Trips
Repeated overloads and electrical faults may damage components over time. Investigate the cause instead of continuously resetting protection devices.
6. Exercise the Generator Properly
Follow the manufacturer’s exercise schedule and operate the generator with an appropriate load when recommended.
7. Use Properly Rated Extension Cords
Undersized cords can create voltage drop and overheating at their connectors. Use cords suitable for the connected current and distance.
8. Follow Manufacturer Maintenance Requirements
Keep the engine and electrical system serviced so the generator runs at its intended speed, temperature, and output.
Frequently Asked Questions
Can I repair generator stator windings myself?
You may be able to repair accessible broken leads, loose connectors, or damaged external wiring if you have the proper knowledge and instructions. Rewinding burned internal coils is specialized work that usually requires professional equipment and training.
Can a generator run with a bad stator?
Yes. On many generators, the engine can run normally while the stator produces little or no electricity.
What causes a generator stator to burn out?
Common causes include overloading, overheating, insulation deterioration, moisture contamination, electrical shorts, and damaged wiring.
Can a multimeter detect a bad stator?
A multimeter can help identify open circuits, broken connections, and major resistance abnormalities. However, it cannot reliably detect every shorted turn or insulation defect.
Can I use ordinary copper wire to rewind a stator?
No. Stator windings require conductor and insulation specifications appropriate for the alternator’s voltage, temperature, mechanical design, and electrical characteristics. Incorrect materials can create unsafe output or premature failure.
Is replacing a stator easier than rewinding it?
On many consumer portable generators, replacing the complete stator assembly is more practical than rewinding individual coils, provided the correct replacement is available.
Can a bad AVR make a stator look defective?
Yes. A failed AVR can cause low, unstable, or missing electrical output even when the stator is healthy.
Should I repair or replace a burned stator?
If the damage is limited to an accessible connection, a repair may be reasonable. If the internal winding insulation is extensively burned or shorted, replacement or professional rewinding is usually more appropriate.
Can moisture damage generator stator windings?
Yes. Moisture can cause corrosion and reduce insulation resistance. Severe contamination may require professional cleaning, drying, and electrical testing.
How long do generator stators last?
A properly maintained stator may last for many years. Service life depends on temperature, loading, insulation condition, moisture exposure, and generator design.
When to Call a Generator Repair Technician
Professional diagnosis is recommended when:
- The stator windings are visibly burned.
- Resistance readings do not match manufacturer specifications.
- Insulation resistance testing is required.
- The alternator needs complete disassembly.
- A winding short to ground is suspected.
- The generator repeatedly burns replacement components.
- Electrical output remains unstable after basic repairs.
- The generator is still under warranty.
A repair technician can perform additional tests, determine whether the stator is repairable, and help decide whether rewinding, replacement, or purchasing another generator is the most economical option.
Summary
Repairing generator stator windings at home starts with proper diagnosis. A generator that runs but produces no electricity does not automatically have a defective stator. The problem may be caused by the AVR, carbon brushes, rotor, breakers, wiring, or loose terminals.
Begin by checking external electrical problems, inspecting the alternator, and performing manufacturer-approved resistance tests. Simple issues such as corroded connectors, loose terminals, and damaged accessible wiring may be suitable for DIY repair. However, burned internal windings, shorted coils, and insulation breakdown usually require professional rewinding or complete stator replacement.
The most important rule is to find the cause before replacing expensive parts. With careful diagnosis and the correct repair approach, you can avoid unnecessary spending and help keep your generator producing reliable electricity for years.
Savior Generator Petcock Gas Fuel Tank Shut Off Valve for Champion Generac | 0j0974,Switch,Predator Etq Homelite Husky Powermax,(16mm x 1.5mm)

Generac 5W-20 Maintenance Kit for 20Kw-26Kw 999cc Generators (Replaces A0002074712)

Pull Start Assembly with Start Cup Compatible with Honda GX120 GX160 GX200 | Recoil Starter Compatible with 28400-ZE1-003ZF 28400-ZH8-013YA Pull Starter Engine 4/5.5/6.5hp Motor (2 PACK)

GNA410 Generator Wheel and Handle Kit for W-EN 4500 and 4750-Watt Generators, Compatible with W-EN DF475T, DF475, GN4500, DF472, DF475X, DF472X

WOTIAN Pull Start Assembly Compatible with Champion 389cc 420cc 439cc 459cc 5500w 7500w 9000w Generator Parts Engine Recoil Starter Part#46.061000.00
About GeneratorStop.com
We are your #1 power generator guide and resource online. We are dedicated on providing you the best and most useful generator related articles, reviews and tools. learn more...